The better you are able to look after your archives, the better we can then look after them in turn, if and when they come into our care at the Aquarius Archives.
If you need a hand after reading the guides below, please contact us.
Introduction to personal archiving
By Adele Wessell, historian
This introduction to personal archiving is intended to get you started, to inspire you to curate your own archive. While there are professional standards and legislation covering archives, records that must be kept, your archive is a way to tell your story or family history. It provides some guidance but leaves the decisions up to you. The main message, if you take nothing else away, is that if you want to start an archive not make yourself crazy and despondent over it; start simply, and, in the end, accept that something can be “good enough”, which is better than not at all.
Start simply
Many of us have a lifelong collection of personal papers and photos we have created or inherited. We imagine there will come a day when we have plenty of free time (on holidays or when we retire), when we are going to organise it all. It can be so daunting and overwhelming that we can be discouraged from the start and not know where to begin.
It is best to start simply and think about the space and time you have.
If you have a spare room to gather all your collection together, you can shut the door on it; that is great. Most of us don’t, so you can start by doing one thing at a time, for example, photos (hard copies and digital), or letters, or 1 box at a time if you’ve been putting all those odd bits and pieces of memorabilia away but unsorted. Make it somewhere you can work, walk away from and go back to.
No matter what type of record you want to save – paper, audio, video, text, photos, emails, and so on – they all require the same essential preservation strategy:
1. identify what you want to save
2. decide what is most important to you
3. organise the content
4. save and store so that you can find it again
Identify records you want to save for the future
All archives are records, but not all records have to become archives. I have thousands of photographs on the hard drive of my computer. They are not saved anywhere else. There are duplicates. There are images I can’t even identify anymore – who is that? where was I? Not everything has to be kept. So a starting point is to identify what you want to save.
Whether you are starting with digital objects – things ”born digital” like photographs or emails – or paper-based materials, you need to go through your records to identify the documents, events, people and places that are important to you.
First, approach your collection as a single unit of stuff – your collection. Think about the entire collection as a mass of related things about your life history – one collection, not 5000 photographs. You can also get easily overwhelmed if you look at every record; it will be time-consuming and not get you very far in this first stage.
Laura Kells and Meg McAleer, two senior archivists from the Library of Congress, advise you to organise in “CLUMPS”. Give yourself time to pull out your collection. Begin by sorting items from your collection into what they expertly call “clumps.” This is your first pass, so just group things into general categories such as letters and photos. You decide on your categories. Be consistent but accept that there might be overlap between categories. If you want to categorise clumps by year. Or phases of your life, such as school, college, work and family. Or holidays. Or places you lived. Or type of materials (letters, photos).
‘What you try to do is identify the clumps that already exist,’ McAleer said. ‘And hopefully clumping naturally occurs. For instance, you could have gotten all of your grandmother’s papers after her death. That’s a clump. Trips? That’s a clump. Christmas stuff, that’s a clump. Photographs, that’s a clump.’
Depending on how big the collection is, you need space. Don’t use your kitchen table because you will have to eat there. And don’t eat or drink around the collection. At this stage, it is all precious, and you don’t want to spoil anything. To recover your space, you might want to put each clump in a box you can come back to. You’ve already created some order over the chaos!
Decide what is most important to you
Caring for the collection takes space and time. You don’t need to keep everything. What do you think you’ll weed out? Sewing materials might be relevant to you – they say something about you, and you’ve had a collection of buttons since you were at school. You decide.
Organising personal collections can be a way to tell a story about your life or the life of a loved one. Don’t be afraid to curate your collection. Zooming in on one particular story or a few items can have a greater impact. You can do it well to really say something about your life you want to share with others.On the other hand, curating also means you can discard those items that are not important to you, for example:
• Duplicate photographs
• Photographs that are out of focus
• Letters or photos from people you no longer remember
• Receipts
• Fake references
• Materials related to short-lived hobbies, like crochet hooks, macrame.
Organise the content
You will want to organise the content for accessibility and for safety. In terms of storage, think about somewhere you can easily access that has stable humidity and temperature, and is dark, dry, and cool.
If you place the materials in plastic sleeves as you go, you will not need to keep handling the records to view them. Try to keep the materials flat and use acid-free paper to wrap them or separate records.
Organise for access
Personal archiving involves adding metadata (descriptive information) to items and providing context, dates or more details about the content. This aids in searching and understanding the significance of each item. Organising requires having a metadata strategy. Metadata makes your records accessible to you.
An overcomplicated file name multiplied by 5000 images would be a nightmare. You need to decide this first.
An example file name format:
YYYY-MM-DD_[CLUMP name or category]_[event]_[short description].jpg
- Be consistent.
- Make file names self‑describing so you can tell what it is without opening it.
- Keep file names very short but meaningful.
- Use only letters, numbers, hyphens, and underscores; avoid spaces and other symbols.
- Use international standard dates: YYYY-MM-DD or YYYYMMDD, ideally at the start, so files sort chronologically.
- Always keep the correct extension, in lowercase (e.g. .pdf, .tiff, .jpeg)
- If you need numbering, use leading zeros so sorting works (e.g. 001, 002, … 120)
You are probably most interested in descriptive metadata for personal collections, but institutional collections also rely on people to share information and enrich metadata, so it is worth understanding.
Even if the record is not digital, you can use file name formats for labelling other material collections as well and creating an inventory or catalogue. Some people like to give their files descriptive names to make them easier to identify. Others prefer to use dates and running numbers, so that the files can be sorted and stored numerically. It doesn’t matter which system you use, as long as you are consistent and able to find the files you want in the future.
With that in mind, you might want to start an inventory if you’re curating a large collection. A do-it-yourself inventory could be managed in a spreadsheet to make your archives findable:
File name | date | title | creator | description | caption | format | location
Preserving digital records follows a similar plan:
1. identify what you want to save
2. decide what is most important to you
3. organise the content
4. make copies 3-2-1: three copies, two different storage media (eg. hard drive, USB), one in a different location
5. manage over time (for example, file formats change, incompatibility, you might have CDs but no drive on your computer)
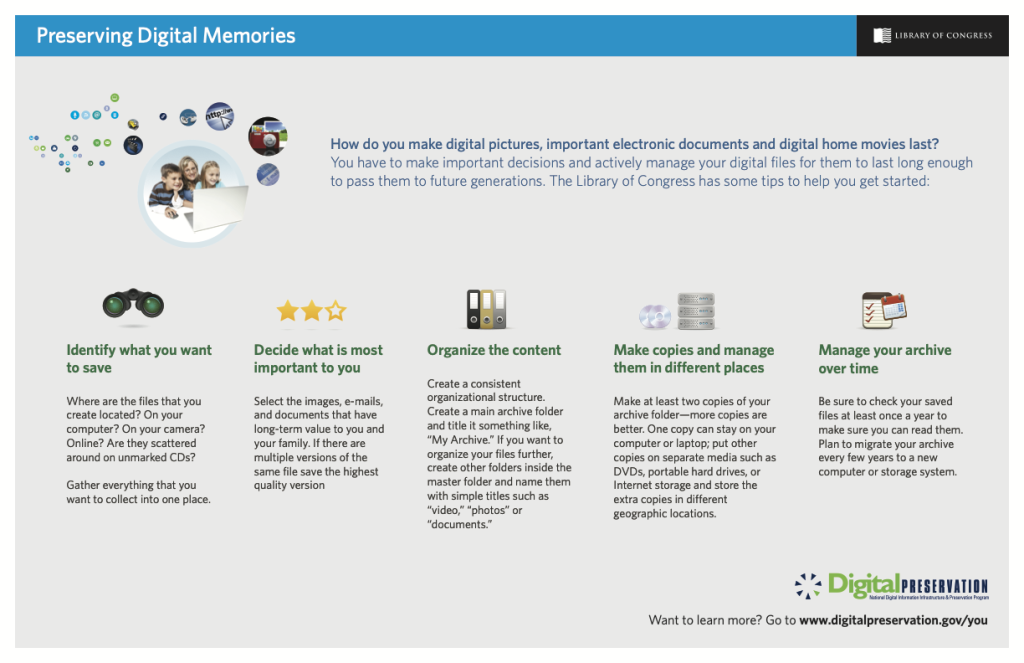
As you bring your collection together, brainstorm all the places you might have digital content stored. For example, you might have photographs on your camera, mobile phone, computer, USBs, CDs, tablet, old floppy discs, and social media platforms.
1.Identify what you want to save
• Gather everything from the computer, iPhone, online and storage devices together
• Separate professional and personal digital objects
• Discard lower-quality duplicates, inauthentic, inaccurate data, obsolescent media and storage
• Migrate file formats at risk of obsolescence into formats that support accessibility
2. Decide what is most important to you
As with hard copies of records, you don’t need to keep all your digital records. They take up storage, and you have to manage them. They clutter up your archive. Decide what is most important to you – those digital objects with long-term value to yourself and your family.
• Identify your audience (family, friends, will executor, etc) and criteria for preservation
• Review email attachments to download those of long-term value
• Create an inventory of content, locations, format, notes, etc.
Materialpossessions take up physical space, and when your collection of material stuff grows too large, it’s easy to see. At that point, it makes sense to weed it all out and get rid of things you don’t really need or want. You assess the value of each of your possessions.
In the digital world, it’s easier to save everything — all of your digital possessions — because 1) the only physical space they take up is the size of the storage device and 2) modern storage devices easily hold terabytes of data. But do you really want to save everything? Or do you want to use this opportunity – now that you’ve identified what you want to save— to assess the value of your digital stuff and winnow it down a bit?
3. Organise the content
Organise the content in a way that is consistent and accessible
• Create master and sub-folders
• Use automated processes where possible, e.g. dates for photographs to organise content
• Use consistent file identification standards, e.g. file titles, date format
• Use your metadata strategy for consistency and record missing metadata to understand content and access• Identify file format standard; use open file formats where possible (not proprietary or obscure formats)
• Backup inventory in a different location accessible to family. Make copies and manage them in different places/geographic locations
• Determine media for storage and requirements
• Preferably three copies: Computer or laptop; internet storage (with passwords accessible), and portable hard drive.
Saving your files on CDs, DVDs, and flash drives may seem like the easiest and cheapest option. However, these options can be easily corrupted and may be obsolete within a few years. An external hard drive makes a good central repository as it can hold a lot of content. And it’s portable. Make a copy of the hard drive and store it in a different geographic location. This is good insurance. If something happens to the content in one place, it is safe in another. Drives can decay or become outdated over time, so check your files for decay or corruption once a year. To ensure ongoing access to your archives, transfer the content from the old drive to a newer storage technology every two to five years.
You can also back up your personal digital collections with online services, or ‘cloud’ storage. But don’t use an online service as your only backup. Diversify. Print is still a good backup option. Print copies of important documents and photographs so you can have them in an alternative, durable format: paper.
Digitisation
When you scan a paper photograph, the scanning device creates a digital version of the photo composed of tens of thousands of tiny dots, or pixels. This paper-to-digital conversion process is digitising, though the act of digitising is not limited to images or text; you can also digitise video and audio. We are just going to focus here on look at scanning and digitising photos.
A scanner is like a photocopy machine, but instead of creating a paper copy, it creates a digital image. If you don’t have access to a scanner, you can use a camera, or even a phone. You want the highest quality possible and a straight, readable image.
To produce a scan, set the resolution to 300 dpi. Dots per inch – or DPI – is a measurement of pixel density or pixels per inch – PPI. This will give you a sharp master image that can be used for multiple purposes. You will be able to make high-quality prints at this resolution. Save this as a master image (TIFF), then make another compressed copy (JPEG) for emails, web, and general use. High-resolution images can be converted to low-resolution images, but low-resolution images cannot be converted back to high-resolution images. The standard paper size for museum archives is: 10 x 8″ TIFF at 300 dpi, Adobe RGB, which should take up about 25 MB (megabytes) of storage.
Once an image is scanned, it needs to be saved. Go to File > Save As on your computer to save it and specify what mode you want. It is recommended to always save scanned images as TIFF files, as they are large, corruption-resistant image files that are very good for archiving. TIFFs take up a lot of storage space, so it is wise to store them on an external hard drive.
It is also recommended that you save each image as a JPEG. This is because they are much smaller, which is very important when viewing your image on screen (email, web, and general use). JPEG or jpg is known as a ‘lossy’ format. It compresses files to save space, but during the process, it loses about 10% of their information. Every time you save it, the file loses a little bit more information and image quality is reduced. A standard 4 x 5″ (20–30 cm) JPEG photo should be around 5 MB (5 000 KB).
Once you’ve scanned your personal collections, make sure you can access them in the future.
• organise by descriptive file names
• create and organise a folder-within-folder directory on your computer in which to store the files
• make backup copies and manage them in different places
• At least two copies
• One in a different location, if practical.
When you’re saving your digital objects on different devices, think about media durability and obsolescence.
Digital cameras automatically add textual data into each photo file, such as the shutter speed, time, date and even the geographic location. This will only be the information taken at the time of the photo, though. If you’re digitising, you can add descriptive information (metadata) to a digital image.
The steps for adding text are similar in different photo-processing programs, and they go something like this:
1. Start the software
2. Open the photo from within the software
3. Select the menu options File > Get Info
4. Type descriptive text into the fields.
You can use the same inventory or template to add metadata, and you can add to it over time. You might have a school photo and share it with friends on social media to help you add the names, for example, so you can grow the information.
Share your archive
As you are going through the process, remember you are creating an archive to share. Enjoy!
Personal Archives Resources
Getting Started
Your Personal Archiving Project: Where Do You Start? – advice from two senior archivists from the Library of Congress’s Manuscript Division.
The history of you and me – What do we mean by ‘personal digital archives’? A National LIbrary of New Zealand blog post.
Personal Digital Archiving
Crystal Clear. concise, easy to use, professional standards and guidance for digitising
Personal Digital Archiving, downloadable pdf by the Digital Preservation Coalition (UK).
Personal Digital Archiving Library of Congress articles about personal digital archiving,
Digital Preservation Basics adapted from the Prints & Photographs Division of the Library of Congress.
Preserving Your Digital Memories: Digital Preservation at the Library of Congress.
Preservation Guides
Handling paper, paintings and framed objects.
online resources. at Museums & Galleries NSW.
reCollections is a six-volume Australian publication about caring for a wide range of collection materials, developed by Artlab and Australian conservators for the Heritage Collections Council.